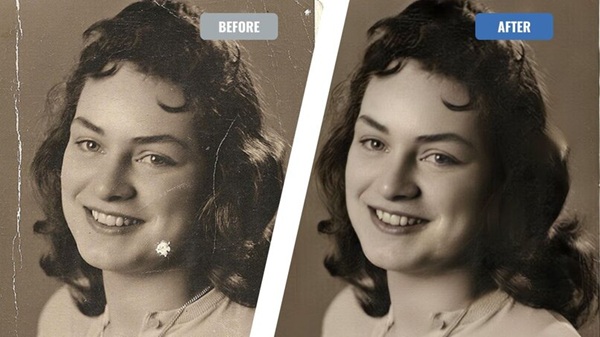
Reversing the Years: How to Fix That Old Photograph
Does the photo book of your grandma whisper stories you would like more clearly? Family photos ripped, faded, or speckled by time might seem as closed doors to treasured memories. And if you have ever pondered how to restore old pictures back to life, you are most certainly not the only one yearning for a magic wand at those faded faces. The rub is that recovering images at home is more easily available than you might think. And you do not need a white lab coat.

Examining the damage up close helps one take stock.
Starting with a deep breath, Look over your picture with great care. This is not a piece of scrap paper. Every speck and furrow reflects a moment that begs a second opportunity. Hold the photograph softly under appropriate lighting—idealized as diffused sunlight or a strong desk lamp. Are your problems with color loss, stains, scratches, or cracks? Is that really a trick of the light, or a coffee ring from Uncle Bob’s well-known Christmas disaster? Often all you need is a closer inspection to distinguish between superficial and chronic damage.
Lay the picture straight then search for folded corners or tears. If it curls up tighter than a sleeping cat, spend many hours between two fresh, weighty books. This will help it to flatten, but be slow. Rushing at this point could backfire more than it helps.
Cleaning: An Easy First Step
A little cleaning goes a long way before entering into any type of repair. Brushing away dust or trash gently with a soft, dry microfiber cloth will help. No; never dip it in water. With most antique pictures, that is a shortcut to disaster. If smudges still show, you can very gently dab with a barely-damp (nearly dry!) cotton swab, only if the print itself isn’t already flaking. Your new best buddy for pictures where damage seems more profound is patience.
If you come across sticky residue, fight the need to scratch or pick. Sometimes a small amount of distilled water will help it come free. Just keep in mind—error on the side of caution. Little deeds add up to great effects.
Key Instruments for Home Digital Restoration
Here is where technology becomes involved. Thanks to scanners and software, even the most aged picture can usually be brought back into the light. Let us go over the basics:
Scanners
For daily tasks, choose a flatbed scanner with at least 300–600 dpi; for delicate or small originals, use up to 1200 dpi. Higher resolution scanning lets you enlarge on minute details without sacrificing crispness. Though the photograph is black and white, be sure to scan in color; color scans pick up faint tones that can be useful for retouching.
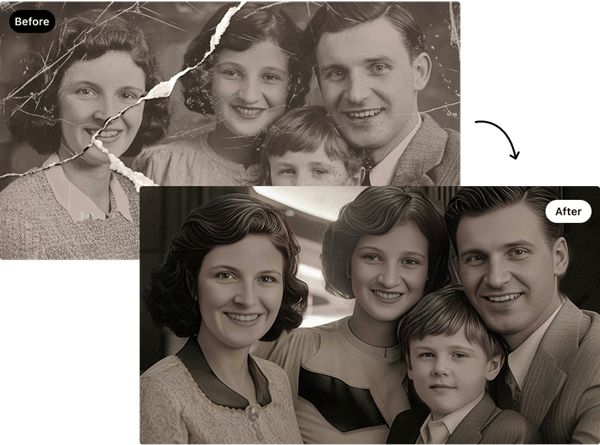
Photo Editing Applications
There are various programs to pick from; both free and paid ones abound. Leading tool in the field is Adobe Photoshop, however GIMP is a competent (and free substitute). Fans abound for Affinity Photo and Corel PaintShop Pro as well. Import your scanned picture and save a backup right away; numerous copies are your friend in experimentation.
optional Graphics Tablet
A graphics tablet might seem like a hand extension for thorough restorations. Popular versions from Wacom, Huion, and XP-Pen are Many novices start with a mouse, which is okay; but, the tablet provides far better control—think of it as painting straight onto your digital canvas.
Archival Gloves and Materials for Storage
Non-abrasive cotton gloves protect prints against finger oil and filth for the purists. Once your masterpiece comes back to life, photo-safe plastic sleeves and acid-free folders aid.
Entering Digital Restoration: The Principal Methodologies
View your scanned image here. Exhale. The magic started right now.
Start in your editing program by building a fresh layer. You are thus acting non- destructively. I promise you; you will thank yourself later.
For minor blebs and scars, use the Spot Healing Brush or Clone Stamp tool. This utility copies and mixes in clean pixels. Go gently; examine your work as you go to avoid going crazy. Go over too much and hit undo.
The Patch Tool lets you mark damaged regions and replace them with healthy spots from elsewhere on the picture for larger tears or holes. You might have to try a little; occasionally, fixing problems looks great, other times it makes things look worse. Should that occur, retrace and attempt choosing another place.
Changing the color balance, contrast, and brightness helps one address discoloration—that sepia yellow or purple tint over faces. Adjustments in curves and levels help to restore washed-out photos to rich tones.
Want even skin tones and a bit of variation in detail? Use the Dodge and Burn tools to add either light or dark when fading has blurring of the boundaries. Use sparingly; a small bit goes far.
Restoring Missing Pieces and Correcting Rips
Try rebuilding the missing portion of your picture (due to time or maybe a hyperactive pet). While the Clone Stamp might be useful, it calls for patience and imagination if you are replacing a face or object. Stretching or twisting until things look natural, borrow comparable patches from another area of the photo using selects and layer masks. Though the procedure is not always perfect, the outcomes usually surprise you.
Look for like textures—a tablecloth, a wall, a lapel—in another area of the photograph if a shredded piece is lacking background. Copy it over, mix the borders, and it will look almost perfect.
Including Black-and- White Images Returning to Life
Images in black-and- white have a particular appeal. Age, however, can make them gritty or flat. Although they help, avoid using too much sharpening filters since you will obtain haloes. Try a small blur first to help to lessen noise; then, just to the focal points, add some sharpness.
A few aficionados choose to include a flash of color. These days, photo editing applications have “colorizing” tools whereby you stacking colors till you get lifelike hues by painting over low-opacity areas with a low-density brush. Refer to actual family or friend examples to create reasonable hues if you descend this rabbit hole.