Restoring Old Photographs Using Methodical Steps: Bringing the Past Forward
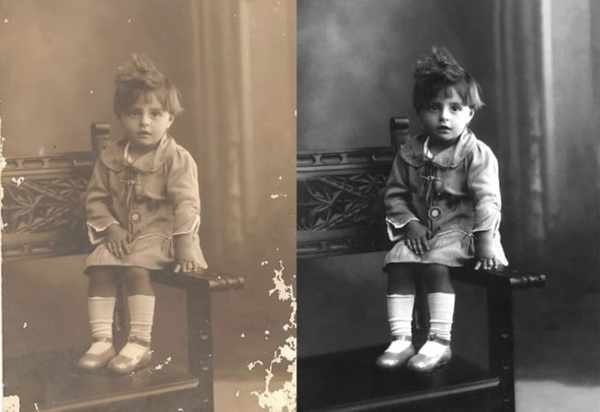
Ever come across an old family picture buried behind a stack of neglected books? Time-worn and delicate, the sepia or fading black and white faces stare back. Maybe Aunt Margie’s smile is hiding a tear or some unexplained stain in the corner. You are in the right place if you are wondering how to ai restore old photo. You do not have to be a digital magician; it is possible to bring those pictures back. Keeping the story behind the picture intact, you can patch rips, correct color, and smooth scratches with easily available software and a little effort.

Examining the Original Image: Foundation Matters
Get your photo digital before touching any program. The first stage is scanning, the foundation. Set your scanner to high resolution; optimal for restoration is between 300 and 600 DPI. To clean dust and filth, gently brush or use a soft cloth. If the surface is sensitive or if obstinate debris still exists, think about employing a burst of bottled air instead of wiping. Face the picture down, close the lid, then scan away.
Look for clarity after the digital material finds its way on your PC. Later fixing of blurry files is nearly impossible. Save the file in PNG or TIFF format; quality is best served by either. These formats are better than JPEG since they don’t compress data losing details. You have a digital backup right now. That alone helps many memories from disappearing with aging to be preserved.
Selecting the Correct Program for Use
Though Photoshop boasts all the honors, don’t discount competitors such GIMP, Affinity Photo, or even niche programs like Retouch Pilot or PhotoGlory. Many of these tools fit wallets or free budgets. You want access to basic repair tools like color alteration options, clone stamps, healing brushes, and patch tools.
If those words sound confusing, relax not too much. They will soon be familiar, like discovering an old sweater you forgot you loved.
Cropping and cleaning help to eliminate visual noise.
Start always with a cleanliness project. Eliminate blank borders and scanner edge using the crop tool. This provides an unambiguous framework for your work.
Then go over any stray flecks or lint the scanner might have immortalized. The Spot Healing Brush in Photoshop or GIMP zaps tiny flaws and dust fast. Zoom in to examine more closely. Go pixel-level without thinking twice. Under close inspection, little defects shrivel.
Healing Major Scratches and Tears
Here is where the fun starts. Though digital gadgets do little miracles, torn photographs present a problem. Your major friends here are the healing brush tools and clone stamp.
Choose the clone tool. Look for a neighboring section of the picture that corresponds with the missing or torn bit. Till the tear vanishes, dab and mix. The Patch tool in Photoshop delivers great results for regions with more complicated textures—like patterned clothes or background greenery. Choose the damaged region then drag the choice to an adjacent intact area. The program combines the two sites.
Sometimes you will feel as though you are a puzzle master discovering the exact piece to close a gap. If a face feature is absent, use other pictures or family recollections to rebuild; don’t hesitate using a little creative license.
Restoring Variations in Contrast and Color
Many ancient images show fading, yellowing, or a washed-out palette. Restoring vitality calls for a gentle approach.
First use the Levels or Curves adjusting instruments. These allow you change the highlights, midtones, and shadows. Often, the right black and white points gives an antique print fresh life.
Check Color Balance and Hue/Saturation choices for color images. If things seem excessively yellow, you can add blue to restore sky and eyes or pull out warm tones. Experiment here. Often magic arises from mistakes and trial and error.
Consider going to black and white in tough situations where colors are wildly off. It sidesteps impossible color reconstruction and delivers a reasonable, timeless sense. For a reason—the drama works—famous movies have been shot in monochrome.
Dealing with minor defects and fine scratches
Though overuse of the Healing Brush and Clone Tool can obscure details, they are useful. Different techniques help your picture to remain clear.
A few programs have a Dust & Scratches filter. It blurs pixel abnormalities it finds. Use a light setting; you want flaws softened, not faces vanishing into a fog.
Play about with the Photoshop Frequency Separation technique. This divides the picture in two layers, one for color and one for texture. Fix surfaces like scratches on one layer without altering color gradients or shading. This produces a cleaner restoration with very minimal loss of detail.
Rebuilding Fabrics, Fingers, and Faces from Missing Pieces
Parts of an image disappear sometimes. Someone’s ear might be absent, or a jacket hem consumed by alkali stains. Correcting these is a more difficult chore best done slowly.

Clone like sections from the same picture first. Mirror it if a left ear survives but the right is absent. Change rotation, size, and placement to fit naturally. If a background fence runs off-frame, copy the design. Enough experimentation will cause none to notice the reconstruction.
Where special qualities disappear, use your artistic ability. Draw missing elements based on known family characteristics or photo-based pattern. One can find success even referring to stock photos. For instance, replace grass designs or sky with like textures taken from photo libraries free of royalties. Just mix with great care to make everything seem real.
Retaking Sharpness Without Making Artifacts
clarity counts. Thanks to faded paper fibers, old pictures might sometimes seem soft or smudged. Though they must be used cautiously, sharpening tools rekindle detail.
Try with Photoshop using Unsharp Mask or Smart Sharpen tools. Dial settings modest; too much might cause “halos” or give faces plastic appearance. Go gradually; remember less is more.
If your program uses Dehaze or Clarity sliders, they will help to gently provide crispness free of strong side effects. Pay especially attention to eyes, grins, and salient features. These are the link between generations.