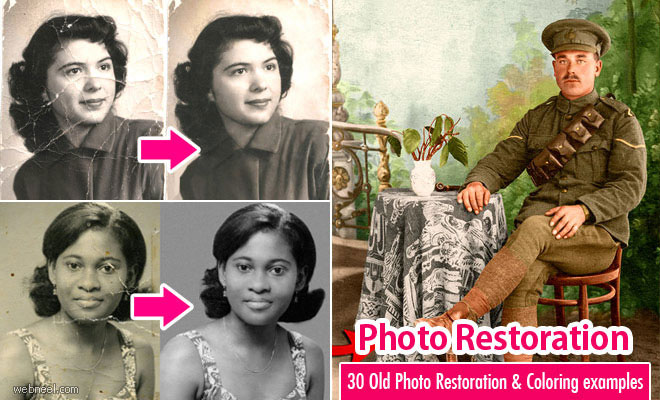
Preserving Memory, Not Only Images: The Foundation of Old Photo Restoration
Older photos have stories. Every fade of color, crease, or scratch hides history. When someone starts doing restoration old photos, the drive goes beyond just fixing a few flaws on paper. Families yearn to see the birthmark on a toddler cousin nobody remembers now, the lacework on a wedding dress, or Grandpa’s eyes shining. These are bookmarks in time, not only graphic elements.

Still, rolling up your sleeves and polishing old pictures at home might soon send you on a crazy trip. Perhaps you scan in a black-and-white 1911 portrait. The faces are only grayish blurs, and the corner coffee stain is large enough to drown a mouse. Excitement or panic starts, but stop before you click “Auto-Enhanced.” Quick changes can eliminate the scant memories the picture still clings to.
Let us travel over the pragmatic aspects of photo repair. We will discuss how to rescue historic detail, common missteps, and—above all—how to make your results worth framing.
Knowing The Surface: The Real Worth of Photo Details
That yellowed paper has more than first greets the eye. Clues regarding the era, photographic technique, even the temperature on shooting day are film grain, paper gloss, unexpected overexposures. Though they may appear like distractions, the faint scribble on the rear, the deckled edges, or a stray fingerprint are relics. Erasing these might satisfy the eye, but at a price to truth.
Study the picture with a magnifying lens before launching Photoshop or GIMP. What is notable? Is that mark actually a fault in someone’s outfit? Document everything with a new scan at the best feasible resolution your equipment can manage—600 to 1200 dpi is a reasonable starting point, particularly for little prints. If you are handling negatives or slides, think about using a specialist film scanner instead than a flatbed.
Consider your objective now. Are you trying to make it “like new,” down to polished excellence? Alternatively should it still seem its age, with meticulous repair meant to just preserve the original narrative? History buffs, please satisfy the historians in your family and allow those little eccentricities endure.
The Science (and Art) Underlying Digital Restoration
Let us now explore pixels and programs. Fancy tools are useless if you run over contrast sliders like-wise. Starting with your scanner, clean it. Each scan will immortalize dust or hair caught beneath the scanner lid; trust me—nothing is more terrible than spending hours repairing digital dust particles.
Resist fast fixes after the raw scan finds its way on your PC. Automatic settings can over-sharpen faces until Grandma’s cheeks seem to be crinkled foil. Play with delicate changes instead. Choose little, light strokes on clone or healing brushes instead of wide sweeps. Although cheatsheets online generally advise “repair the background first, then the subject,” occasionally backgrounds include shadows or things essential to the tale; handle these with care.
Washed-out grayscale or fading colors need for patience. While forceful alterations will leave everything flat or ghostly, curves and levels can pull detail from darkly shadowing corners. Particularly with JPEGs, digital “noise” generated from over-editing is difficult to detect at first but nearly impossible to reverse. Save your work as uncompressed TIFFs all during the process to prevent image artifact stacking.
The Psychology of Restitution: Avoiding Erasure
Our brains use mental filling in gaps to “fix” ancient portraits. If you’re not careful, this may cause Grandpa’s wool clothing to become a smooth, modern parka—or if your reference is too modern, you could find yourself coloring hair with a 2020s flair. Family members could remember “something blue” in a dress, but it’s safer to leave colors neutral than speculate unless you have primary sources—a recorded color match or another surviving picture from the same day.
Not sure about ornaments, buttons, ribbons either? On a uniform, a little insignia could represent a military rank, a club, or participation in a historical group. “Tidying up” might wipe that difference entirely. In doubt, research is your friend. Priceless are libraries, neighborhood historical societies, even Facebook groups for local towns or vintage cameras or local businesses.
Typical Mistakes in Do-It-Your Own Photo Repair
Starting the newest AI filters is appealing as they instantly create magic. They are also well-known for destroying background context, texture, and facial individuality, though. The dimple of a baby vanishes, or wrinkles becoming plastic-smooth. Though strong, AI tools should augment rather than replace hand-based touch-ups. Always have a copy of the unaltered scan available.
One other rookie action is over-saturation. Although turning faded blue jeans bright or skin tones beet-red won’t be accurate, likes on Instagram could come from this. Generally, less is almost always better. Same for employing too much blur or sharpness; this erases freckles, fabrics, even background calligraphy. Overdone noise reduction smooths away all that gives the image life-like quality.
The Function of Lighting and Showmanship in Viewing Restored Images
Digital screens show color and contrast different than paper. If printing is your intended use, work in the sRGB or Adobe RGB color spectrum that printers understand. Many small details—like dark backgrounds—can disappear from photographs printed too bright or with too high contrast. Always check your restoration on several devices; if at all possible, order a tiny print for a test run before producing large copies.

UV protected glass frames help to slow down future fading. Matrix and paper free of acids stop yellowing. Store original copies once scanned out of sunlight, away from heat or moisture. Sometimes the picture you repair is not the one you display on the wall; rather, it is the one you keep for the next generation to enjoy in its natural, labor-intensive clarity.
Dealing with Damaged Original Materials—tears, Stains, Missing Pieces
Let’s discuss the sad stuff: missing edges, jagged tears, or ink smears from Aunt Margaret’s ballpoint “Xmas ’58.” Digital restoration allows you to replicate ripped edges; avoid wild guessing here. If you must, properly tend to your crops; if you are filling in lost areas, employ surrounding detail. Cloning from a mirrored part or comparable texture—such as wallpaper or a uniform—can produce respectable repairs if the image has such areas; just avoid creating extra fingers or impossible patterns.